Showing posts with label bathroom. Show all posts

Friday, May 22, 2015

Bedroom and Bathroom Update, Part III

When I last left readers, I promised I'd have a third and last update on the bedroom and bathroom.

While it looks a bit spare in the bedroom yet, I've been enjoying the awesome feeling of having finished walls in the majority of it.


But I've got this one wall left to tackle, that had to be completely demolished due to a slow leak left to spread when the previous owners improperly winterized the plumbing pipes in the bathroom.


That's the common thread between the bedroom and bathroom. They share this wall. On the other side, my looking-much-better sink and vanity: 


But also an ugly medicine cabinet mirror:


That lighter material in the inner frame is fabric. It catches dust and grime, toothpaste and makeup, and is pretty unspeakably gross most of the time. It also has no design relation to the awesome chrome sconces.

I have a better one that I picked up at a flea market for $20. I love the etching at the top, it fits the era of the house (late '30s) much better, and it's going to go great with the sconces.


The interior medicine cabinet part is a bit bigger than the old mirror, but without the frame, the replacement mirror is narrower on the wall. Which will make the sconces look less crowded than they do now.

And what better time to replace the medicine cabinet when you've got the entire wall behind it missing?


The top two arrows show the back and interior framing of the medicine cabinet.

The bottom left arrow shows where the leak was, and the plumbing repair. And the bottom right arrow shows an awkwardly sawed-off ventilation duct.

This is where I call in the troops. Or in this case, the handyman. I've decided I'm hiring it done. I've got three main reasons why.

1. Lugging sheets of drywall single-handedly up my narrow and contorted stairwell seems like a good way to injure myself, cuss myself all the way to damnation, and dent/crack said drywall. Mostly likely all three.

2. I don't know wth is going on here, I don't know how to fix it, I don't have sheet metal tools to fix it, and I don't want to know how to fix it.


3. It frees me up for more pressing work, exterior painting and landscaping, that I should be doing right now and am capable of making good headway on immediately.

There's also a sense of just wanting to be able to make some great progress in both rooms by simply signing a check. I've been a bit overwhelmed lately, both with house projects and stuff going on in my family life. I know when assistance, even if I have to pay for it, is going to make a big difference in my mental well-being. This is one of those times.

I'll be back next month with some progress reports for both rooms; in the meantime, I'm going to enjoy the start of summer break with my boys for awhile.  Time for books and popsicles!

Tuesday, May 19, 2015

Bedroom and Bathroom Update, Part II: The Bathroom

Last weekend was a long one, where I spent the entirety of three days in stinky paint clothes, cramming peanut-butter sandwiches in my face without washing my hands, standing over the kitchen sink. I didn't comb my hair. The rest of the housework went completely to hell.

Six weeks ago (in this post) I explained the wretchedly ugly state of my upstairs 3/4 bath, and also that I had a very small budget for fixing it. People gave me some awesome ideas in the comments, and while I can't execute any of them yet, I'm still grateful for all of them because it gave me some radically new ways of thinking about some old problems. While what I'm doing today is the "Good Enough For Now" version of fixing up the bathroom, the ideas readers gave me will be the fuel for the "The Real Deal" renovation. So, thank you!

Living in an old house with a small budget, I've discovered that there are two weapons in the arsenal of home renovators that don't get talked about much on home improvement shows. And of course they wouldn't, because it doesn't involve ripping everything out and spending thousands of dollars on products advertised on their programs.

One of them is cleaning thoroughly. I certainly did that in this bathroom, scrubbing walls, vanity, and rehabilitating a toilet that, while not old, certainly needed some serious cleaning attention after years of neglect from the previous owners (please let me pause for a moment so I can shudder. THAT was a gross day. A gross, gross day.)

The other is paint. If you can't replace surfaces, paint them. Paint products have improved to the point you can paint nearly every surface you can think of: cabinets, floors, even tile and countertops. While quality paint is not cheap, it's still a far better per square foot bargain than replacement. Especially if you haven't completely decided what you want to do with a space, need time to save dollars for what you really want, or would rather brighten up worn but quality surfaces rather than replacing them with sub-par builder's grade stuff.

That's the route I went with this bathroom for the "Good Enough For Now" renovation. Cleaning and paint. Lots and lots of paint. In fact, I feel as though I stood at the doorway of this bathroom and threw gallon after gallon in there. And it's such a small room.

While I'm far from finished, here's the so-far progress.  Here's a before shot:


And here's a progress shot:


The vanity went from this:


To this:


The vanity got a top-to-bottom coat of a Valspar color called Cream Delight, made in Sherwin Williams Cashmere low-lustre finish. While I'm not necessarily a huge fan of the trend in white cabinets, in this case the color seemed to tone the sink top way down. It seems far less objectionable on top of a white vanity.

I like that SW's low-lustre hits a sheen somewhere between satin and semi-gloss. Valspar used to make a similar finish called Kitchen & Bath, but they have discontinued it. I am anti-semi-gloss paint. Unless it's sprayed onto new and perfectly joined wood, it doesn't look right to me. In an older house where finishes have seen some love, it seems to highlight every ding and imperfection.

The cabinets got some funky knobs. These were less expensive than the old fashioned glass knobs (which are out in the hallway in the linen built-in) but the geometic shape echoes their facets. Also, shiny. Which makes my inner glitter raccoon happy. And a gap that existed between the wall and the vanity has been properly caulked, making it look more finished than it did before.

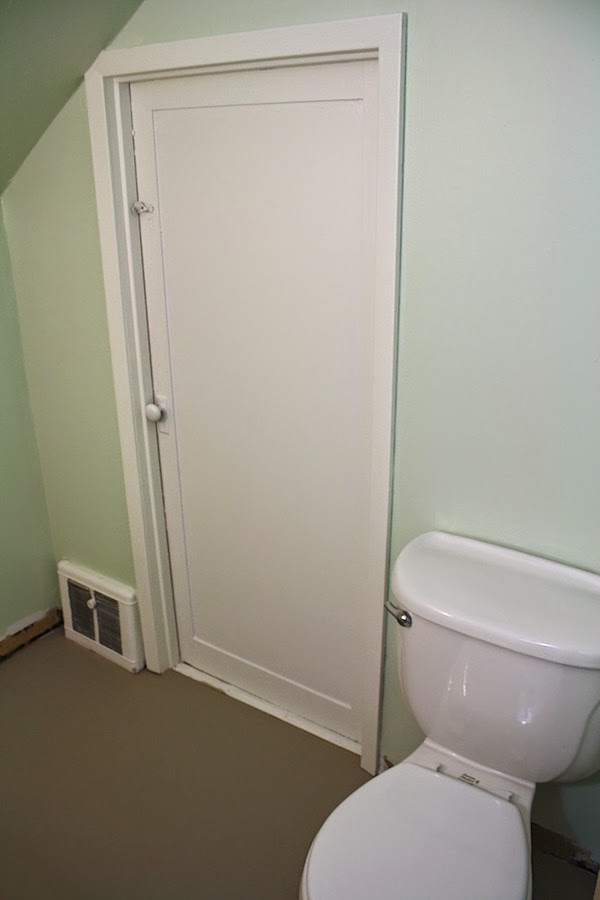
The walls got a coat of Valspar's Pale Oak Grove, a very soft pale green, again in SW's Cashmere low-lustre. The attic door is also in Valspar Cream Delight. The floor is not anywhere near as dark as it is showing in this photo, though the wall color is very true.


The floor got sanded, cleaned and primed. I really didn't mind the pattern, square-and quatrefoil, but it was worn and dirt-stained, and the color was not my favorite.


Look how classy I am, using the sink as my temporary tool box!


I painted it with a satin latex paint that I picked up from the mistint shelf at Lowe's for $5. It's a very basic taupe color, and finding it was one way I tried to squeeze a few dollars out of the overall bottom line. I also figured out, from a stack of paint chips I had laying around, that the color is nearly exactly Pantone Oxford Tan, if anyone is interested. I'll be keeping everyone out of there until the paint has had several days to cure, and I can put a coat of clearcoat sealer on it.


Here I've propped up some scraps of basebord trim, to give an idea of a finished space:


I've got more to do, like replacing the faucet, painting the ceiling in the shower stall, installing the trim and priming and painting the door. Sharp eyes may have noticed the wall the vanity is on is not yet painted. I've got some issues I'll cover in the third post, coming soon. Stay tuned!

Sunday, May 17, 2015

Bedroom and Bathroom Update, Part I: the Bedroom

I've been slowly making progress in my bedroom over the winter and spring. It's been slow because it's plaster work, which seems like an endless round of plaster-dry-sand-plaster-dry-sand-plaster-dry-sand. Okay, it doesn't seem like. It IS. You do it until you begin to shake drywall dust off your underpants when you pick them up off the floor, and then you start to carry beers up to your bedroom to drink while you work. And then maybe you decide that perfection is kind of a bitch and "good enough" is easier to live with. I live in an older home, so imperfect walls make it "quaint and cottage-like," right?

Sure.

Again for those who are just joining us, this is what the space looked like in 2011:


That view above in more recent months became this:


And then we continued on around the corner:


It's also been tedious because I've been doing a section at a time, by hand, and cleaning up after each step to keep the dust way down. I don't have the room to move all the way out of my bedroom while this is going on, so it's been a lot of months of making little messes, cleaning them up, scooting furniture this way and that, and doing it again. It's been a little crazy making. But progress has been ongoing.


The color is Valspar Bay Waves. It's actually a bit darker than it shows in the photos, but it's still a very soft, dove-like gray. I like how soothing it is. The brown-painted window is now white, after about eleventy-billion coats of primer and paint.

I've primed the floor, and moved the dressers into position for the next stage.


The color on the walls is actually the same, though it appears darker in the nook. I love comparing these photos to the very first one! And if you're alarmed by the difference of floor color in the nook versus the rest of the room, don't be. That's just a primer coat, and they got it as dark as they could to make for easier coverage when the paint goes down, but it isn't as dark as the actual floor paint. That'll go down last, when I'm completely finished with wall work.


You can just see, on the bottom left edge of the photo above, the unframed doorway to my closet. That is a whole other can of....well, not worms. More like a pile of shoes on the floor and tangles of bras on hooks. But definitely a whole other can of project.

Now I'm done with all of the walls except this one, the Wall of Tragedy:


It used to be a wall of shelves made (badly) out of particle board and faux wood vinyl panelling, that got pulled apart when a plumbing leak was discovered in the wall when we moved in. There are some other issues with this wall, which I'll discuss in Part III. Stay tuned for that. That's my floor stencil hanging up there. It seems like as good of a place as any. To the left is the nook again (we've come full circle around the room). And to the right is the door out into the hallway. My bedroom door opens out into the hallway rather than in, due to crazy roof lines.

There's a ton of small things left to do. I need to clean up the window panes from the painting job, and there's also still a broken pane here, which I will get to next summer when I reglaze from the outside. There is a missing sash lift and I need to clean up the lock. I need to touch up paint dings and drips here and there. I need to find the plate covers for the outlets (they're around here somewhere....).  And of course there's still trim work. I feel closer to done, though. It's a good feeling.

As the post implies, there's two other renovation updates coming soon, next time on the upstairs bathroom. Stay tuned!

Saturday, March 28, 2015

A Post In Which I Start Another Mess, Instead of Finishing Ones I've Already Started

I feel like I'm trotting out my worst personality flaw in this post.

Anyway, this will be part confessional, part renovation post. And if my brothers and sisters in home ownership can offer me any absolution, please do.

When I start thinking about what I want to do to my house, I think a long time. A long, long time. Because I am afraid of making mistakes, or getting half-way through something and changing my mind.

Then I daydream and scheme. Also, a long long time. Because that's the most enjoyable part.

Sadly, this bath will never happen in my home (Image Source: Arts and Crafts Home)

In my head I can have anything:

Again, sadly, nope. (Image source: Better Homes and Gardens)

And I don't have to buy anything, demolish anything, get sweaty, angry, or discouraged. It's all magic and glitter and marble countertops and done-ness. Can we hear it for DONE?

That's what gets me started. That's what gets me to the local hardware store, list in hand. And then real life happens. Because man, this home renovation thing is UGLY. It takes forever. It's always twice, three times, four times more expensive than I thought. There's always some snag in the renovation that I can't think or spend my way around, and I stop, get discouraged, rooms languish, and I find myself living with unfinished projects for an indefinite period of time.

It's about then I begin to think my faith in this one thing, this relationship with this one old home, is completely superficial, and that I'd be better off in an apartment, a new condo, ANY place where I could just drink coffee from my sofa and call the landlord when I was displeased. Maybe buy some new toss pillows. Luxurious yawn.

Sigh. Right here, everyone, is where I start this process yet again. With the upstairs bathroom. At least we start with the ugly part, up front and in your face.

My house is a one-and-a-half story Cape Cod colonial, so the upstairs rooms are low ceilinged. There was no bathroom up here to begin with, but sometime (I think the late 1960s) someone carved out space in one of the two bedrooms for a very small and awkwardly-shaped 3/4 bath.


That is the view from the upstairs hallway. Inspiring, isn't it? You can see the shower stall to the right, and the sink vanity, further into the room, on the left. The toilet is hidden in this photo, on the other side of the wall from the shower. The roofline is sloped up from the back of the bathroom. Let's step further into this charmer, shall we?


To the left, the sink top may actually not be that bad, if the right colors were with it and it was updated with a new faucet. But it's sitting atop a vanity that may possibly be made of pressed cardboard or something similar in quality.


On the right, we have the door to a side attic, and the toilet. People who are on my personal Facebook account know I spent a very, VERY unpleasant day a few weekends ago thoroughly cleaning the toilet, inside and out, and replacing the seat. It's in much better shape now, but I was very close to the point of either trying to sterilize it with a flame thrower, or having it replaced.


And the end of the bathroom opposite the door. There's actually quite a bit of floor space here, but it's under the roof slope. It makes the layout rather cramped in the total perspective of the room, but also odd. Notice the black vinyl baseboard slopped with white paint. Awesome. The spots on the floor are also paint splotches of various colors, mostly teal and salmon pink.

It also has charming details like this:


There's been approximately 1500 towel bars hung in this bathroom over the course of its history. And the mounting holes from them have all been repaired, exactly like this.


Super shiny paint. With low ceilings and grubby surfaces, the only thing one could do to make it worse is to paint it all (sloppily) in high gloss paint, so the whole thing is bathed in an oily, lurid glow.

The one good thing? These sconces:


Now that I've introduced you to the challenge, some considerations.

1. My excuse for starting this project is the renovation of my bedroom, ongoing right next door to the bathroom. There's a relation between the two which I will explain further in a future post. But it makes sense that some of the work needed to these two rooms comes along at the same time.

2. I have maybe a $200 to budget for this room. That's not a lot; in fact it's practically nothing. What happens in this room is going to be mostly cosmetic.

3. I've already started in small ways-- deep-cleaning the toilet and replacing the seat, tearing out all the towel bars and vinyl baseboard, sanding and repairing the walls.

4. My goal is to make this bathroom something we can live with in the meantime. Because larger chunks of the budget are going to have to go, by necessity, to the downstairs bathroom.

There. I have officially started yet Another Mess. I'll talk more about Finishing Ones I've Already Started soon. Soon. Sigh.

Friday, July 25, 2014

Lots of Bubbly Vintage Tile Love


These are so awesome it's hard not squee when I look at them. They are aggressively colorful with red, yellow, green, blue, and purple glass, white-glazed dimensional "bubbles," and a background that is gray with an overspray of gold crackle glaze.

Shut the front door, they've got everything.

The other thing they've got is my heart strings, because they came from my aunt's house. My aunt married in 1960, and she and my uncle built a little brick ranch home on a farm in Missouri. I've always called it "pink and pepper," though I don't really know the real name for the brick style.


This is the only photo I could find of the place as I remember it as a child; but perhaps it's just as well, because the foreground explains everything about the heartstrings part. I spent a great deal of my childhood running around that farm, barefoot, sweaty, dirty, picking green beans and cherries and sweet corn, and generally getting into trouble with pack of equally grubby cousins. I think the photo above is from 1976 or 1977, and shows (from left) my sister Dyan, my cousins Thea and Leah, me (with my glasses slipping down my nose, as always) and my cousin Anya, playing with (and hopefully not torturing too badly) a toad.

What I don't have is a picture of the bathroom in that house in all its former glory. Salmon pink field tile, blonde wood cabinetry, and these accent tiles. It was marvelous. One of my earliest memories as a child is sitting in the bathtub at my aunt's house, running my fingers over the smooth glass bubbles, enchanted by the color and the glamor. My own bathroom at home was very plain, and these were just too much for my child-like desires to bear. I was going to have something just as fabulous when I grew up.


While my aunt and uncle still live in the same house, about 10 years ago the bathroom got remodeled. Mid-century enthusiasts can be dismayed if they want, but the lady of the house had grown tired of salmon pink and 40 years of wear on a bathroom is more than enough. I was sorry to see the tiles go, but I understood.

A few weeks ago, my mom was helping my aunt clean her basement, and found these, eight of them, in a storage box. They'd been salvaged. They both remembered how much I loved them as a little girl, and my aunt gave them to me.

I have to admit, I have no idea what I'm going to do with them. My long range plans for the downstairs bathroom has always been an aqua and black tile bath. I know I am not interested in a salmon pink tile bath, but I do like the way these tiles look with a dove gray:


That's a paint chip of Woodsmoke by Eddie Bauer Home. And again, there are only eight of them. My wheels are turning. Perhaps a framed wall hanging instead? I do not know for sure, only that I'm deeply happy to have something from my childhood back in my life like this. It's the best kind of serendipity.

Thursday, February 20, 2014

Better Reflections: Bathroom Mirror Moves Out


While bedroom improvements take a small break so I can organize my tools and supplies for the next push, I'll update on a little progress with my bathroom.

Last summer, I got so frustrated by the gigantic 90's style half-acre mirror that dominated my small bathroom, I ripped it out.


Just the blank, cobwebby space felt better than that overwhelming mirror, but then I also painted to get rid of the oddly brownish purple mauve paint.


I still have to contend with the "airport landing" light fixture, and the counter, sink, and faucet. But I hung a small 25 inch square piece of scrap mirror to use until I figured out what was happening with the big mirror. 

Unfortunately, it ended up waiting in my dining room, leaned up against the wall.


And waiting.....


....while I painted outside all summer and the pages flew off the calendar. This last weekend, I got so frustrated by stalled piles of various things that I crammed a bunch of stuff in my van. Goodwill got six bags, the curb got two or three, and the mirror? Gone, daddy, gone:


But only for a little while. Instead of investing in an entirely new mirror, I decided to have the large one trimmed down to a more manageable size. It's gone to visit a glass and mirror fabrication shop for a little cosmetic surgery.

I'll have another post when it's back in the house and mounted on the wall. I'm looking forward to the results of the bathroom's next mini-facelift!

Wednesday, July 3, 2013

Bathroom Progress: Mauve-B-Gone!

Here is my before:


A half-acre mirror and prune baby poop mauve paint. Blech.


I didn't realize until I painted what a huge psychological drag that room was on me. I'm grateful it wasn't in a bedroom, or I may have required a therapy intervention.

I placed the arbitrary goal of having the bathroom painted before my sister arrived for a two weeks visit. I say arbitrary because my sister is a reasonable human being who's rehabbed her own old home before (A 1910 foursquare Arts and Crafts) and knows all about living with the ugly until it comes around on the project list.

Still, sometimes an upcoming event is the motivation to get my rear in gear. Here's what my geared rear did in a weekend-- progress:


It's changed the whole look of the room. It's lighter and airier, the sunshine actually reaches all the way into the room instead of just lurking gloomily by the window, and looks and feels clean rather than muddy.

The ginormous mirror that used to dominate the entire room...


...has been replaced by a temporary 25-inch square I had hanging around the garage:


It's got a few dinged corners and is far from perfect, but it'll do until I find a more permanent solution. It's looking like I will need a custom size, and I know I'll want to put a lot of thought into that before I order it.

It's amazing to me that reducing the size of the mirror in the room seemed to make the room seem larger. Conventional design wisdom states that mirrors give a room an enlarged sense of space. In this bathroom I seemed to have discovered the cross-over point to diminishing returns on that rule of thumb, where a larger mirror is unescapable, overwhelming, and even a little disorienting. At any rate, the smaller mirror is an enormous relief.

I also replaced the L-shaped shower bar (the ceiling support looks a little wonky above because of the angle of the camera. It isn't!), a job that took two people, 8 hands (yeah, you do the math on that one), and cursing of drywall anchors. There are no pictures in an effort to protect the privacy of the victims. And everyone should also be grateful there was no audio.

As wonderful as the paint is, these are still "progress" shots, rather than "afters." I've still got to replace the light fixture and cabinet hardware, the countertop and sink, and add the fun stuff-- window treatments, art, and decorative items. I also need baseboard trim.

I'll admit I'm a bit on the fence about the color of the cabinetry with this new paint. It seems more orangey in comparison to this color. But I'm not really in the mood to embark on a cabinet painting project right now, so either way we'll live with it.

I've crossed a big one off the list, and I couldn't be happier. I find myself walking into the bathroom to flip on the light and just look. No more mauve!

10 Mini Projects for the Bathroom

1. Upgrade the cabinet hardware.
2. Grout the floor.
3. Paint
4. Replace the light fixture
5. Replace the mirror--Sort of. 
6. Replace the toilet paper holder.
7. Replace the shower curtain rod.
8. Add art and decorative items.
9. Replace counter top.
10. Replace sink and faucet